Hello everyone, have you ever wished for a super-efficient way to manage your Blogger blog without getting into the dashboard. Well, guess what? There is!
Today, we will dive into some cool settings and features (often overlooked), that can truly unlock the hidden efficiency in your blogging routine. It is the Blogger email posting and notification settings (aka; mail-to-blogger, and post using email). Once you get the hang of these, you’ll wonder how you ever blogged without them.

Table of Contents
Blogger Email Posting Settings
It might sound like something very technical, and hard to accomplish. But, Blogger offers some neat email integrations that can seriously streamline how you create content and stay connected with your readers. We know that sometimes these features can feel a bit hidden or even confusing.
That is where this guide comes in. Here we will discuss in detail the email posting settings and how you can efficiently manage your blog’s notifications.
So, let’s get started and make your blogging life easier.
Setting Up Post using email (Mail-to-Blogger)
Ready to learn this cool trick? You can actually turn your emails into blog posts. This feature Post using email (often called Mail-to-Blogger), is super handy when you’re on the go or just prefer to write in your email client.
Activating the Email Setting
First you need to activate the post using email setting.
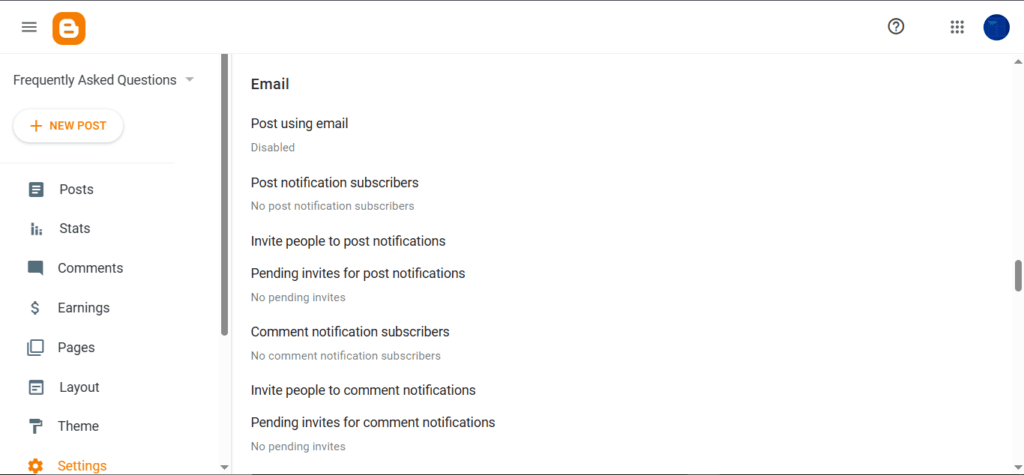
Head over to your Blogger dashboard, select the blog you want to setup for email posting, and then in the left menu, click on Settings. Scroll down until you find the Email section (it might also be labeled Mobile and email in some versions) and click on “Post using email”.
To get started, you’ll need to head over to your Blogger dashboard:
Select the blog (not post) you want to setup for email posting.
In the left-hand menu, click on Settings.
Scroll down until you find the Email section and click on “Post using email”.
Creating Your Secret Email Address
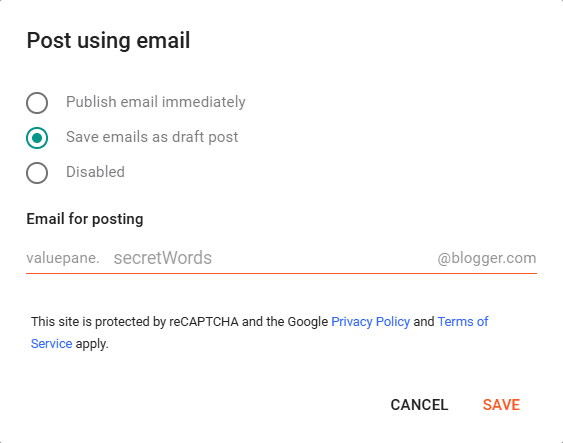
Now comes the fun part: creating your unique, secret email address for posting. In the pop-up window, under “Email for posting,” you get to choose a “secret word”. This word, combined with your username, will form your special email address in the format username.secretword@blogger.com
Important Note: This email address is like a direct key to posting on your blog as you. So, it’s absolutely crucial to keep it private and secure! Don’t share it publicly. Think of a keyword that’s easy for you to remember but hard for others to guess.
You’ll also need to decide whether you want Blogger to “Publish email immediately” or “Save emails as draft posts”. If you choose to publish immediately, whatever you email will go live on your blog right away. If you opt to save as drafts, your emailed content will appear in your Blogger post drafts for you to review, edit, and then publish later. This is great for moderation!. Once you’ve made your selection and created your secret word, click “Save“.

Basic Posting
Alright, your secret email is set up! Now, how do you actually post?
It’s as simple as sending an email.
- Create a new email in your email client (like Gmail, Outlook, etc.).
- In the subject line of your email, type in the title of your blog post.
- The body of your email will become the content of your blog post. You can write your text just like you normally would in an email. Basic formatting like paragraphs is generally retained.
- If you want to include an image, simply attach it to your email. Blogger will usually include these attachments in your post. Keep in mind there might be limitations on the number and size of attachments.
- To indicate the end of your post content in the email body, you can type
#endat the very end. This helps Blogger know where your main content stops. - Finally, send your email to your unique Blogger email address– (username.secretword@blogger.com).
That is it! Depending on the setting you chose, your email will either be live on your blog or waiting for you in your drafts.
This can be particularly useful if your blog has multiple authors, though you’d need to manage that secret email address very carefully.
Remember:
- The subject line of your email will automatically become the title of your blog post.
- The body of your email will be the content of your post.
- The attachment will be treated as the image for your post.
- #end will signify the end of post
Advanced Mail-to-Blogger Techniques
Want to take your email posting skills to the next level? Here are a couple of more advanced things to consider.
Publishing Immediately vs. Saving as Draft
We touched on this earlier, but let’s delve a bit deeper. If you choose to “Publish email immediately,” it’s fantastic for quick updates or when you’re absolutely sure about your content. However, if you value a review process or want to add more advanced formatting, saving as “Save emails as draft posts” gives you that crucial step before your content goes live. You can then log into your Blogger dashboard, find your drafted post, make any necessary edits (like adding labels, more complex formatting, or embedding videos), and then hit “Publish”.
Scheduling Posts via Email
Now, this is where things get a little nuanced. While the idea of scheduling posts directly from email sounds incredibly convenient, Blogger doesn’t natively support scheduling through email commands alone based on the resources. The Mail-to-Blogger feature is primarily for immediate posting or saving as a draft.
So, if you draft your post via email, you’ll likely need to save it as a draft. Then, you’ll have to log into your Blogger dashboard, find the draft, and use the standard post settings to schedule it for your desired date and time. To do this, when you’re editing your post, look for the “Publish” option (it might say “Immediately”). Click on it, and a calendar will pop up where you can set your preferred publish date and time. Then, click “Schedule”. While some older outlines might mention specific codes for scheduling via email, the current functionality seems to rely on the dashboard for the actual scheduling.
You may be interested to know about the other settings in Blogger
Mastering Blogger Notification Settings
Staying engaged with your audience is key, and Blogger’s comment notification features can help you do just that!. You can receive email alerts whenever someone leaves a comment on your blog, allowing you to participate in the conversation and moderate effectively.
Configuring Blogger Comment Notification Emails
To get these handy notifications, you’ll need to activate them in your Blogger settings. Go to Settings and look for either Mobile and Email or just Email. In some newer versions, the option might be under Settings > Email > Invite More People to comment notification emails. Here, you can add one or more email addresses (up to ten, separated by commas) that should receive notifications for new comments.
If you’ve enabled comment moderation (which is a great way to filter out spam!), you can also configure an email address to receive notifications for comments that need your approval. This ensures you don’t miss any legitimate comments waiting in the moderation queue. Once you’ve entered the email addresses, remember to “Save” the settings.
Managing Comments via Email
Here’s another efficiency booster: you can often manage these comments directly from the notification email you receive. The email usually includes options to “Publish,” “Delete,” or “Mark as spam” the comment. This means you don’t always have to log into your Blogger dashboard just to manage your comments – you can handle them on-the-go from your inbox. This immediate management is super helpful for keeping your community engaged and addressing comments quickly.
Troubleshooting Comment Notification Issues
Sometimes, you might find that comment notifications aren’t arriving in your inbox. Don’t panic! Here are a couple of things to check.
- Spam Folder: First and foremost, check your spam or social folders. Notification emails can sometimes end up there. Make sure to mark them as “not spam” if you find them there to help future emails arrive in your primary inbox.
- Reset Configuration: If they’re still not appearing, a potential fix is to remove your email address from the comment notification settings, save the changes, and then re-add the email address. This can sometimes reset the connection and get the notifications flowing again.
Managing the Spectrum of Notification Settings
Beyond just comments, Blogger offers other email-based notifications to keep you in the loop about your blog’s activity. You can usually find these settings within the Settings > Email section.
For example, you can configure Blogger to email new posts to specific recipients. In the “Email posts to” section, you can add email addresses (again, up to a limit, often ten) that will receive an email whenever you publish a new blog post. This is useful if you have co-authors or want to keep stakeholders informed.
The “Pending author invites” and “Pending comment notification emails” sections also give you an overview of any invitations you’ve sent out that haven’t yet been accepted. This helps you track who still needs to confirm their author status or comment notification preferences.
Making the Most of Blogger’s Email Features
Blogger’s email features, especially Mail-to-Blogger and comment notifications, can be real game-changers for your blogging workflow. They offer flexibility in content creation and make it easier to stay on top of audience interaction.
While Mail-to-Blogger provides a convenient way to post from anywhere with email access, remember its limitations regarding advanced formatting and the critical need to protect your unique email address. And although you can’t directly schedule via email, using drafts in conjunction with the Blogger dashboard’s scheduling tool still allows for efficient content planning.

Mail-to-Blogger: Recap
Let’s quickly recap the power of Mail2Blogger settings. It’s essentially a bridge between your email and your blog, allowing you to create content from practically any email-enabled device.
Remember the key points:
Subject = Title
Body = Content
Attachments = Images
#end = End of Post
email address for posting = username.secretword@blogger.com
However, always be mindful of the basic formatting limitations and the crucial need to keep your unique Mail-to-Blogger email address confidential.
Conclusion
Blogger’s email posting and notification settings are truly valuable tools that can significantly boost your blogging efficiency and help you stay connected with your audience. By understanding how to set up and effectively use Mail-to-Blogger, you gain the flexibility to write blog posts from anywhere. And by mastering your notification settings, you can stay on top of comments and keep the conversation flowing.
Now that you know the process, go ahead and explore these features! Try the settings, send a test post via email, and customize your notifications. By taking the time to master these often-overlooked aspects of Blogger, you’ll unlock a new level of convenience and control in your blogging journey. Happy blogging!
By understanding and utilizing these email-integrated features effectively, you can streamline your blogging tasks, improve your responsiveness to your readers, and ultimately enjoy a more efficient and engaging blogging experience.
So go ahead, give these features a try, and unlock a new level of efficiency for your Blogger blog.
