Planning to move your website to a new host without downtime? A website migration guide can simplify the process, ensuring a seamless transition for your WordPress or custom site. This post provides a step-by-step checklist for switching hosts, covering backups, DNS updates, and testing, with practical tips to minimize disruptions.
We’ll highlight tools and services, including Hostinger’s website migration support, to make the process straightforward for beginners and pros alike. Whether you’re seeking better performance or lower costs, this guide on how to migrate a website to a new host ensures your site stays online and fully functional.
Table of Contents
Why Migrate to a New Host
Switching web hosts can improve site performance, reduce costs, or enhance support. Common reasons include slow load times, frequent downtime, or outgrowing your current plan’s resources. For example, moving from shared to VPS hosting with providers like Hostinger or SiteGround can boost speed by 30-50%. Better customer support or advanced features like daily backups also drive migrations.
But, website migrations carry risks like data loss or downtime if not planned carefully. A structured checklist minimizes these risks, ensuring a smooth transition. This guide applies to WordPress, custom sites, or e-commerce platforms, with examples from Hostinger’s tools but adaptable to providers like Bluehost or GoDaddy.

Website Migration Guide
Step 1: Evaluate and Choose Your New Host
Before migrating, select a host that aligns with your needs. Compare providers based on uptime (99.9% or higher), speed, scalability, and support. For instance, Hostinger offers affordable plans with LiteSpeed servers, while SiteGround emphasizes WordPress optimization. Check for migration tools—many hosts provide free or automated services.
Assess your site’s requirements: traffic volume, storage, and features like SSL or CDNs. Read reviews on Trustpilot or Reddit for real user feedback. Once chosen, sign up for a plan, but don’t update DNS yet to avoid downtime. This step ensures your new host, like Hostinger, supports a seamless migration.
Step 2: Back Up Your Website Completely
A full backup protects against data loss during migration. For WordPress, use plugins like UpdraftPlus or Duplicator to save files, databases, themes, and plugins. Alternatively, access cPanel’s Backup Wizard (common with hosts like Hostinger) to download a complete site archive, including emails and settings.
For non-WordPress sites, use FTP clients like FileZilla to download files and phpMyAdmin to export databases. Store backups on cloud services like Google Drive or locally. Verify backup integrity by checking file sizes and testing restores on a local server. A verified backup ensures you can recover your site if issues arise.
Step 3: Set Up the New Hosting Environment
Prepare your new host before transferring data. Install your CMS (e.g., WordPress) via the host’s control panel—Hostinger’s hPanel offers one-click setups. Create a temporary domain or staging site to test the migration without affecting your live site. Configure email accounts and SSL certificates to match your current setup.
Test the new environment’s performance using tools like Pingdom to ensure it meets expectations. For example, Hostinger’s SSD servers can reduce load times compared to older hosts. This step confirms the new host is ready, minimizing disruptions when you go live.
You may be interested to know how to choose the best web hosting.

Step 4: Transfer Website Files and Database
Transfer your site’s files and database to the new host. For WordPress, upload files via FTP to the public_html directory, including wp-content, wp-admin, and wp-includes. Import the database using phpMyAdmin: create a new database, select “Import,” and upload your .sql file. Update the wp-config.php file with the new database name, user, and password.
For custom sites, follow similar steps, adjusting for your CMS or framework. Hostinger’s File Manager simplifies uploads, while Bluehost offers guided migrations. Test the transferred site on the temporary domain to catch errors, ensuring all content, plugins, and themes function correctly.
Step 5: Update DNS Settings Strategically
Point your domain to the new host by updating DNS records with your registrar (e.g., GoDaddy, Namecheap). Change the A record to the new host’s IP address, found in your host’s control panel (Hostinger provides this in hPanel). Lower the Time-to-Live (TTL) to 300 seconds a few days prior to speed up propagation, which can take 24-48 hours.
Keep your old host active during propagation to avoid downtime. Use a staging site to test the new setup, ensuring zero interruptions. This step, when timed during low-traffic periods (e.g., late nights), minimizes user impact and maintains SEO performance.
Step 6: Test the Migrated Site Thoroughly
After DNS propagation, test the migrated site across devices and browsers. Check page load times with Google PageSpeed Insights, ensuring they match or exceed your old host’s performance.
Verify functionality: test forms, navigation, e-commerce features, and media. Use tools like Broken Link Checker to identify 404 errors.
Compare analytics (e.g., Google Analytics) pre- and post-migration to confirm traffic and engagement stability. Hostinger’s support can assist with issues, but providers like WP Engine also offer testing guides. Thorough testing ensures your site operates flawlessly before decommissioning the old host.
Step 7: Finalize and Monitor Post-Migration
Once testing confirms the site is fully functional, cancel your old hosting plan, but retain backups for 30 days as a precaution. Update any third-party services (e.g., email marketing, payment gateways) with new server details. Monitor performance with tools like UptimeRobot for a week to catch any issues.
Submit your sitemap to Google Search Console to maintain SEO rankings. For example, Hostinger’s SEO tools simplify this process. Ongoing monitoring ensures your migrated site, whether on Hostinger or another provider, delivers optimal speed, uptime, and user experience.
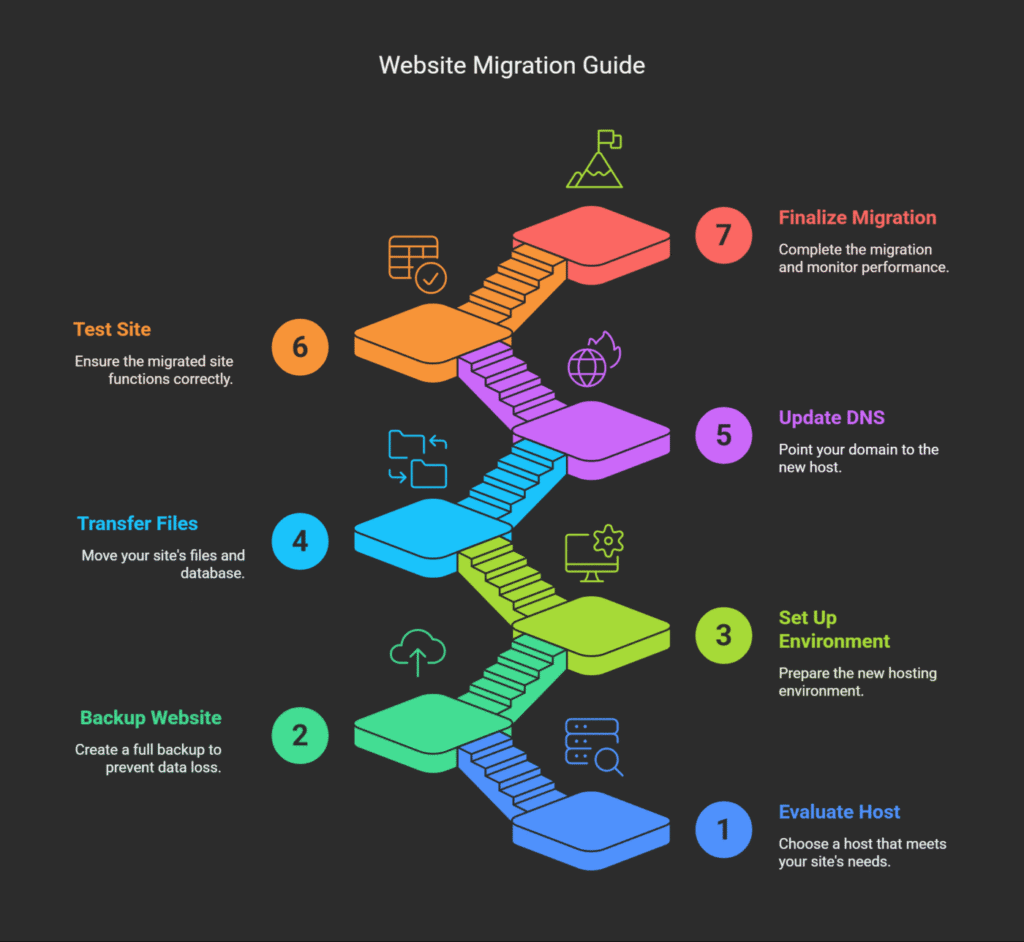
Infographic on Website Migration Guide

Conclusion
Switching hosts can transform your site’s performance, cost-efficiency, and support quality. By following this website migration guide, i.e. evaluating hosts, backing up, transferring data, and testing—you can minimize risks and ensure a smooth transition.
It is not uncommon to find that during your first migration using the Managed WordPress hosting plan, the hosting company usually offers to migrate your site for free.
Providers like Hostinger, SiteGround, or Bluehost offer tools to streamline the process, but this guide works universally. Plan your website migration during low-traffic periods, test thoroughly, and monitor post-migration to maintain a seamless user experience.
